

Posting Manual EOBs
POSTING EOB’s
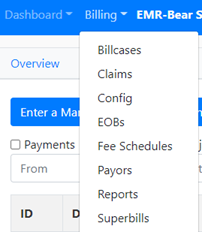
1) There are two separate processes for posting EOB’s in EMR Bear: a. Manual EOB’s i. This includes denials, checks, etc. received via mail, or research on the portals for missing payments/denials. b. 835’s i. Includes electronic remittance received from the clearing house. 2) All posting is completed under the EOB tab in EMR Bear.
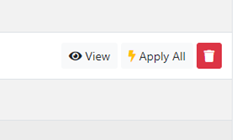
ii. Apply all button allows the EOB to be posted as is with no review. This is not recommended.
iii. The red trash button should only be used for rare circumstances, like duplicate EOBs. Again, not recommended. b. Open the EOB with the View button. i. Several items that appear at the top of the screen.
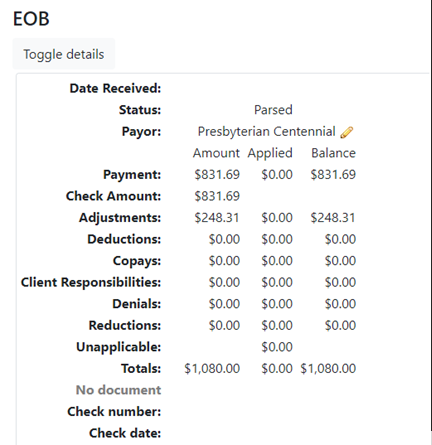
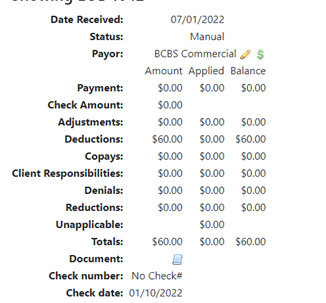
- EOB – this is the EOB# that is auto assigned in EMR Bear, when the 835 is uploaded.
- Date Received - this is the date that check was received from the clearing house.
- Payor – The payor defaults to what the is sent from the payor (in this example Presbyterian Centennial). The pencil beside the payor name allows for the payor to be changed (i.e., Presbyterian Centennial to Presbyterian Commercial). a. Most of the payor name changes happen between Medicaid plans, Commercial and a Medicare plan when a provider has multiple contracts under a payor.
- Payment – this is the amount of all payments for the check.
- Check Amount – this is the actual amount of the check (this may be different than the payment amount if there are recoupments or additional payments for corrected claims).
- Adjustments – this is the amount of adjustments between the billed amount and the allowed amount. Always double check the adjustments since the payors will send over a denial as an adjustment. This can be corrected on the individual lines.
- Deductions – deductible amount that is client responsibility.
- Copays – normally nothing appears in the field.
- Client Responsibilities – this will show client copays/coinsurance
- Denials – amount of denials appear here.
- Reductions – amount that the payor is saying are reductions. Work of caution here, if the amounts are posted as reductions, it shows the balance on the account as double what the original charge amount was. 9 times out of 10 this is a denial and can be adjusted on the individual line.
- Unapplicable on 835s this normally does not apply.
- Totals – this shows the total of all the columns for amount, applied and balance.
- Check number – this is the check number from the payor.
- Check date – this is the check date from the payor. a. This is important for several reasons. Calling payors for additional information on a check they will ask for the check number and check date. b. For the clients this is beneficial for the balancing of the deposits, most accounting departments will utilize the check date, check number and check amount for balancing. i. Scroll down the page to the Progress section
- This shows all the claims that are paid on the check.
- Under the payor column: This will show the payors that were billed on the individual bill cases.

a. This provides the information on whether the payor name will be changed. (i.e., Presbyterian Centennial to Presbyterian Commercial). - The progress provides the information on how each bill case was processed on the check+
-
a. Green:

Is good, this means a payment on the bill case. b. Grey:

this is the adjustments. Again, just confirm that if there is only an adjustment on the bill case line that it should be updated to a denial (i.e., only line shown is a CO 96 – this is a denial as non-covered.) (CO-45 with a payment will stay as an adjustment, same with the CO-131, both are adjustments.) i. The drop down that shows how the line will be posted can be changed. Simple click on the down arrow and select the proper placement for the posting.

- Once all the bill cases have been reviewed for the EOB the final step is applying the transactions in the EOB.
- At the bottom of the screen, two important items are located.


Note: This will save hours of research when dealing with audits.
iv. No check is always marked when opening the screen.</br>
1. Uncheck the no check and enter the check number, check amount and check date. f.


- Paid = Payment
- Deducted = Deductions
- Adjusted = Adjustments
- CL Res = Client Responsibilities
- Denied = Denials
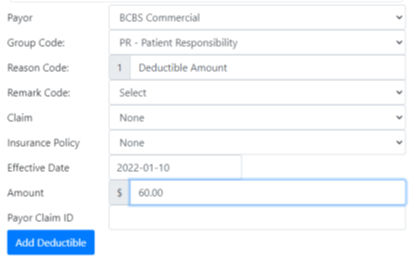
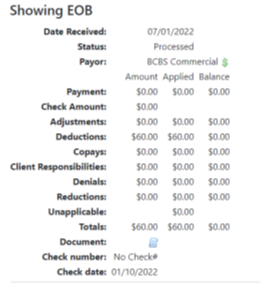
Table of Contents
Other Billing Articles
- Fee Schedules
- Fees
- Payor
- Payor Plan
- Incident to Billing
- User credential for Billing
- User Roles
- Front Desk Billing Configuration
- Certification or Licensure number
- Provider number
- Adding location
- Billcase
- Superbills
- Billing configuration
- Billing the secondary and the tertiary insurance
- Printing claims
- Batch processing printable claims
- EOBs
- Specifying billing codes In the form
- Printing individual claims
- Claims
- Refund / Recoups payment
- Bundled service
- Taxes
- Aging report
- Payments
- Creating Statements/Copay Report
- Fixing a denied claim
- UB-04
- Claim printing settings