

Creating a New Form
The Forms are defined in two steps. First, define the Form as a whole and assign properties that are unique to that form. Second, assign the models or Sections to the form. By assigning the models, the form is constructed to capture specific information. For instructions on how to add or modify form models go to the section, Adding or Modifying Form Models at the end of this section.
How to add new form to EMR- Bear
To add a new form, goto Dashboard>Clinical>Forms
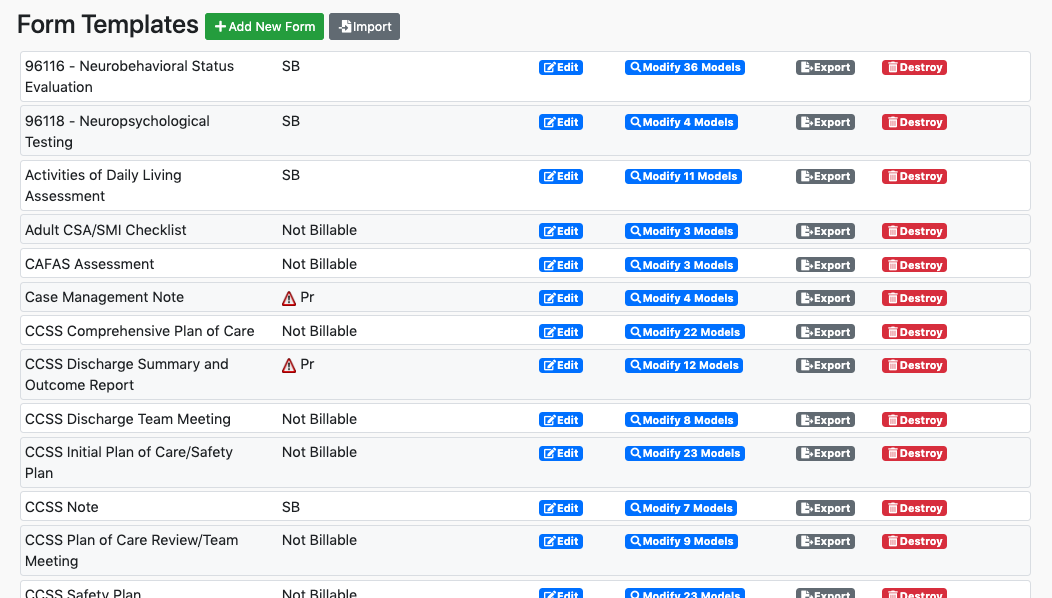
To add a new form, click on Add new form.
Explanation of form fields
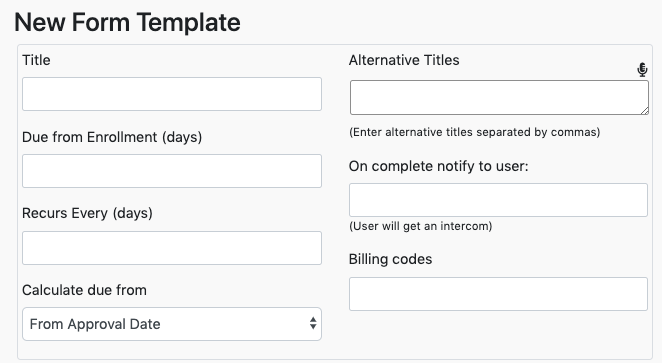
Title: This is the form heading. It will display at the top of the form when viewed on screen or on pdf (e.g., Initial Assessment).
Alternative Titles: This option allows the form to display a different title. If Alternative Titles are included, a menu with the Alternative Title choices will populate when the Superbill is presented to the User. If a title other than the default title is chosen, then that title will display at the top of the form.
Due From Enrollment (days): This field can be blank or enter a number representing the quantity of days for that form to be filed from the client's effective enrollment date or approval date in a given program. If completed with a value, the client's chart will provide visual clues in terms of timely completion of the form. It will remind it on the client file
Recurs Every (days): (repeat after) This field can be blank or enter a number representing a quantity of days. When a number is entered, the system prompts with visual clues that a form needs to be furnished again for a given client (e.g., if 365 is entered, the form would need to be re-assessed every year).
Billing Codes: This field can be blank if no Superbill will be furnished when completing this form. If a procedure code is likely to happen upon completion of the form, then the accepted billing codes offered in the Superbill form have to be entered here. If more than one code is entered, then they have to be separated by commas.
On complete notify to user: In certain cases, a User of the system might need to be promptly notified when a form is completed. If a User is entered in this field, that User will receive an internal intercom (message) stating the form was completed for a given client.
Explanation of display field
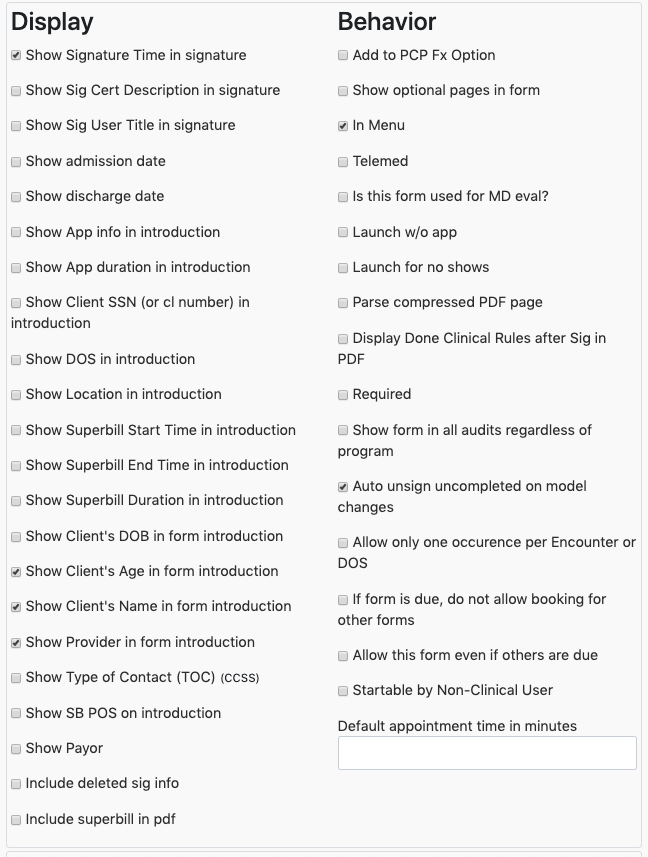
Show App info in introduction: Checking this box displays appointment information in the introduction of the form.
Show App Duration in introduction: Checking this box displays the duration (in minutes) of the original appointment at the top of the form.
Show Client SSN in introduction: Checking this box will display the client's SSN in the form introduction.
Show Location in introduction: Checking this box will display the encounter location in the form introduction.
Show Superbill Start Time in introduction: After the Superbill is completed, the start time will be included in the form introduction.
Show Superbill End Time in introduction: After the Superbill is completed, the end time will be included in the form introduction.
Show form in all audits regardless of program: If this box is checked, when an auditor visits an auditable record for a given client, forms that are marked as such will be included in the audit report, regardless of the program the auditor is reviewing documents for.
Show Client's DOB in form introduction: The client's DOB will be included in the form introduction.
Show Type of Contact (TOC) (CCSS): Checking this box will display the Type of Contact in the form introduction.
Show SB POS on introduction: The Superbill Place of Service will be included in the form introduction. If several procedures occur in the Superbill POS, it will default to the first POS of the first procedure.
Required: This field is not significant yet and can be left blank or checked without changing any behaviorShow Payor: The Payor name will be included in the form introduction.
Show Signature Time in signature: Checking this box displays the time at which the electronic signature was executed. This will be rendered in the pdf document that the form produces.
Show Sig Cert Description in signature: Checking this box displays the initials of all the certifications on file for the signing User. Certifications will follow the User's signature (e.g., PhD, MD).
Show Sig User Title in signature: Checking this box displays the full description of all titles for the signing User. Titles will follow the User's signature (e.g., Medical Doctor).
Show optional pages in form: Checking this box displays the optional models in the form. This is better understood when adding models into the form.
Needs Mgmt Review: Checking this box will require that the form be signed by a User in addition to the Clinical Supervisor. This might be required for billing purposes and would prompt a signature from a Clinical Director or Location Manager of a particular program.
Add to PCP Fx Option: The form will be included in the drop down "Send to PCP", this is a work in progress feature.
In Menu: Doesn't apply yet.
Telemed: Checking this box will affect the billing behavior of the form, creating two instances of billing Superbills, one for the Telemed session, one for client services.
Is this form used for MD eval?: If the form is used for med eval, some analysis logic will be rendered on the Superbill to help with the coding.
Launch w/o app: Checking this box allows the form to be launched outside the context of an encounter or an appointment (e.g., Notes that a provider might want to add after a phone contact).
Show admission date: Checking this box displays the program enrollment admission date in the form introduction.
Show discharge date: Checking this box displays the program enrollment discharge date in the form introduction.
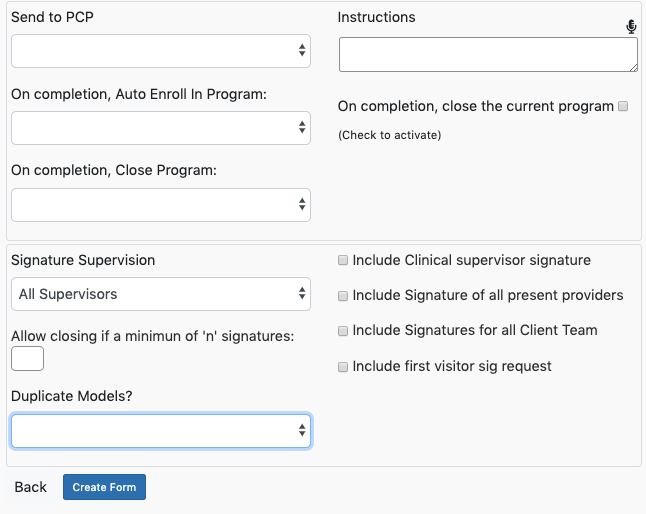
Send to PCP: this is a work in progress and not active.
On completion, Auto Enroll in Program: when a program is selected, whenever a form is completed using this template the system will attempt to automatically enroll the client in the given program.
On completion, Close Program: Selecting a Program from the drop-down menu prompts the system to close the Program associated with that client upon completion of a form using this template.
Duplicate Models?: This offers a drop-down menu displaying the forms that already exist in the system. This is a time saver when creating forms that are alike but differ in only few models. Selecting an existing form creates a template for the new form, which can be adjusted by adding or removing models from it.
Instructions: This displays information to the system Users before launching the form. Use this space to enter as much text as needed to give information about furnishing this form.
After you define the main characteristics of the form, you will need to add models to the form template (or add/remove if you choose to duplicate models). We recommend reading the Prebuilt Models and the Custom Models section of the documentation before proceeding with adding models to the Form Templates.
Prebuilt Model
Form models, pages, or form sections are the units used to build up a form. EMR-Bear has more than 200 models available and keeps adding them as the need arises. Documentation about each model is provided separately. It takes some time to get acquainted with each model's documentation capabilities. Some models are plain text data entry fields while some others have complex interactions with data in the system or with other models. The best way to understand and fully train on each model is to create a form that has every model on the system and therefore allows opening each of those models in a single environment. Depending on your contract, EMR-Bear provides a Sandbox System for trainees to practice and refers to this form that includes all models as the "Master Form".
Adding and modifying form models
Although the process for adding models to a form is fairly simple, determining which model should be part of your form might not be as simple. Familiarizing with the models is very valuable when it comes to creating forms.
To add models into a form click on the link next to the form that reads "Models".
This opens a window that details the Models for a particular form (we are using the form for BMS Discharge Summary).
This form has 3 models that make up the form. They are Form Introduction, Discharge Summary BMS Discharge Summary, Superbill, and Signature. Note the positions of each model, which allows the addition of other models should the need arise. The box at the bottom of this page allows you to enter additional pre-existing models from the Page or Custom Model drop-down menus.
The bottom part of the form will look similar to this:
Pre-Built Model: This displays a drop-down menu listing all the pre-built models available in the system.
Custom Model: This display a drop down for all the custom built models.
Position: sets the order on how the models will be displayed in the screen and in the PDFs.
Optional?: tells the form whether it can be signed or not without completing the model. For example, if a form has a model "Mental Status" and it is checked as optional, then the practitioner will be able to sign the note for completion without completing the "Mental Status" model. If the same form has the check box for the model "Mental Status" unchecked, then it means that it is mandatory for the practitioner to complete the "Mental Status" model before signing the form.
Allow as is?: This thing if checked will tell the form to accept as it is like last. This will create a green accept as it is button under the file section.
The form will accept a signature depending on whether the mandatory (non-optional) models have been completed or not. Most forms should start with the "Form Introduction" model first. The form introduction will create the header and display the date and appointment information. We assign the position "10" to show it first, as all other position numbers will be in multiples of 10. Using multiples of 10 allows you to insert a form later that you might want to view ahead of an existing form (e.g., using position 9). When the form is created, a new screen will show the progress in the form. At the top of the page, the models that are already in the form will be displayed. At the bottom of the page, the same form is used to add more models to the Form. A good practice would be to add both the Superbill model and the Signature model with high position numbers so they will be situated at the end of the form. As models get added to the form the view changes to show the current models inside the form. Note: If the form is billable then the superbill model is mandatory.
Adding Form to desired Program Forms for a specific program and location may be added or modified by going to Clinical -> Program Within the Program screen as shown in the figure below,locate the program you want the form to be added under and then go to “view/add Forms” within that program. To the right of each section, click the blue link to "View/Add Forms" to add the form to the desired program.
click on the view/add Forms link to add new form the program. clicking on the link will open up the page to modify and add forms. After adding the form to the program, you can complete it by going to File section in the client file.
The box at the bottom of the page is used to add new form to program. you can modify the existing form by hitting the Modify button. Assign the position to each form. We assign the position “10” to show it first.
Table of Contents
Other Forms Articles
- Document Timeliness
- Viewing all the due documents
- Document Tracking
- Unfinished notes/Unstarted notes
- Client tracking.
- Clinical Template Forms
- Prebuilt Models
- Adding and Modifying Models
- Client PDF
- Basic Models
- Special Input Models
- Treatment Plan Models
- General Use Model
- Client File Forms
- Group Notes Forms
- Custom Models
- Restrict Form View to Creator Only
- Save Incomplete Models